Edentulous patients, those who have lost all natural teeth, present unique challenges in dental practice, particularly in obtaining accurate scans and achieving proper occlusion. Unlike dentate patients, edentulous individuals lack natural landmarks such as teeth, which play a critical role in defining occlusal relationships and guiding the scanning process. The absence of teeth also affects the stability of prosthetic appliances during the scanning procedure and makes it more difficult to establish functional and esthetic outcomes.
Additionally, the varying conditions of the oral cavity, such as the shape and resilience of the soft tissues, ridge resorption, and the presence of undercuts or sharp bony edges, further complicate the process. These anatomical and physiological variations make it difficult to ensure precise impressions and accurate digital scans. Achieving proper occlusion in edentulous patients is equally challenging, as it requires careful consideration of jaw relations, vertical dimension, and balanced articulation without natural teeth to serve as reference points.
This introduction highlights the complexities involved in managing edentulous cases, emphasizing the need for advanced techniques, digital technologies, and skilled clinical judgment to overcome these hurdles and ensure successful outcomes.
In this article, we will explore how to effectively manage cases involving edentulous patients, focusing on the detailed steps and strategies required to address the challenges of obtaining accurate scans and achieving proper occlusion.
Step 1: Data Acquisition
CBCT (Cone-Beam Computed Tomography)
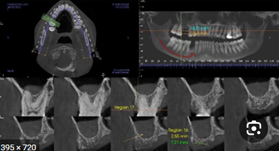
CBCT plays a crucial role in the data acquisition process for edentulous patients. This advanced imaging technology provides three-dimensional views of the oral and maxillofacial structures, offering detailed insights into the anatomy of the edentulous jaw. Unlike traditional two-dimensional radiographs, CBCT captures critical details such as the shape and volume of the alveolar ridge, bone density, and proximity to vital anatomical landmarks like the maxillary sinus and mandibular nerve.
For edentulous patients, CBCT is indispensable for planning implant placements, assessing bone resorption, and identifying undercuts. It helps ensure accurate positioning of implants and prosthetic components while minimizing risks to surrounding structures. This high level of precision contributes to designing stable, functional, and esthetic prostheses, making CBCT an essential step in managing edentulous cases.
Accurate Scan
Obtaining an accurate scan is a critical component of the data acquisition process for edentulous patients. Unlike dentate patients, edentulous individuals lack natural landmarks such as teeth, making it challenging to capture precise digital impressions. The anatomy of the edentulous ridge, including its shape, texture, and degree of resorption, varies significantly among patients, requiring tailored approaches for accurate scanning.
Advanced intraoral scanning technologies or traditional impression methods must be employed with care to capture the intricate details of the soft tissue and ridge morphology. Accurate scans are essential for fabricating prostheses that ensure proper fit, comfort, and functionality. Additionally, precise digital impressions facilitate better communication between the clinician and the dental laboratory, streamlining the design and manufacturing of custom prosthetic solutions.
Conventional Methods for Taking Impressions in Edentulous Patients
The conventional approach to taking impressions for edentulous patients involves multiple steps aimed at accurately capturing the anatomy of the edentulous ridges and surrounding tissues. This method ensures a proper foundation for the fabrication of stable, functional, and esthetically pleasing dentures. The process generally includes:
1. Preliminary Impression
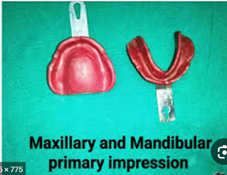
- Purpose: To obtain a rough mold of the oral cavity, including the edentulous ridges and surrounding anatomy.
- Materials Used: Typically, a stock tray and alginate or impression compound are used for this initial step.
- Outcome: The preliminary impression provides a general outline of the oral structures, which is used to create custom trays for the final impression.
2. Custom Tray Fabrication
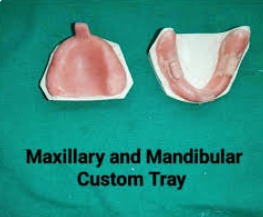
- After the preliminary impression, a custom tray is fabricated to closely fit the patient’s ridges. Custom trays improve accuracy by providing better adaptation to the patient’s unique anatomy.
3. Border Molding
- Purpose: To capture the functional width and depth of the vestibules and ensure proper extension of the denture flanges.
- Technique: A thermoplastic material or impression compound is applied to the edges of the custom tray. The patient is guided to perform various movements, such as opening and closing the mouth, smiling, and moving the tongue, to shape the borders dynamically.
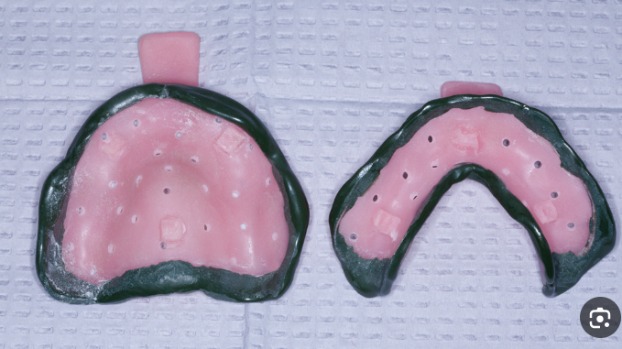
4. Final Impression
- Materials Used: Elastomeric materials such as zinc oxide-eugenol paste, polysulfides, or polyvinyl siloxane are commonly used for their precision and ability to capture fine details.
- Technique: The custom tray is filled with the chosen impression material, and the patient’s mouth is positioned to ensure accurate alignment of the maxilla and mandible. The impression is taken under light pressure to mimic functional conditions.
5. Master Cast Creation
- The final impression is used to create a master cast, which serves as the basis for designing and fabricating the denture.
Importance of Conventional Impression Techniques
While digital techniques are becoming increasingly popular, conventional methods remain a reliable choice for many clinicians. They are particularly advantageous in cases where digital scanning technologies may struggle, such as with highly resorbed ridges or irregular soft tissue contours. Additionally, the use of traditional impression materials allows for a more tactile approach, ensuring that every aspect of the patient’s oral anatomy is accurately captured.
These methods, though time-intensive, provide a high degree of precision and have stood the test of time in the fabrication of well-fitting and functional dentures for edentulous patients.
Dual Scan Protocol for Edentulous Patients
The dual scan protocol is a widely utilized technique in digital dentistry, particularly for edentulous patients, to combine the benefits of CBCT imaging and digital scanning. It involves taking two separate CBCT scans and merging them to create a precise virtual model of the patient’s anatomy, which is critical for treatment planning, implant placement, and prosthetic design.
Steps in the Dual Scan Protocol
Dual-Scan CT Protocol for Fully Edentulous Cases
Introduction
The dual-scan CT protocol is a crucial step in digital treatment planning (DTP) for fully edentulous cases, ensuring that guided implant placement supports an optimal prosthetic-driven outcome. This protocol involves capturing two separate CT or CBCT scans—one of the patient wearing a well-fitting denture and another of the denture alone. Proper adherence to this workflow ensures accurate surgical guide fabrication and enhances implant treatment predictability.
Material Requirements
To perform a successful dual-scan protocol, the following materials are required:
✅ Existing well-fitting denture or a clear acrylic duplicate scan appliance
⚠️ Denture must NOT contain metal or mesh; wax rims are not acceptable.
✅ Radiolucent bite registration material (e.g., Capture Clear Bite Registration)
✅ Hard-reline material or VPS medium-body reline material (if the denture does not fit well)
✅ Fiducial markers (radiopaque stickers or gutta-percha material)
✅ Foam or Styrofoam block (to elevate denture during scanning)
Step 1: Denture Reline (If Necessary)

If the patient’s existing denture is ill-fitting, a reline is necessary to ensure proper adaptation of the surgical guide and optimal implant positioning.
- Inject the reline material (chairside hard-reline or VPS medium-body material) onto the intaglio surface of the denture.
- Guide the patient into centric occlusion while the reline material sets.
- Remove the denture and trim excess material to ensure a proper fit.
⚠️ Avoid using soft-reline materials, as they may cause radiodensity issues, leading to the need for additional scans.
Step 2: Bite Registration
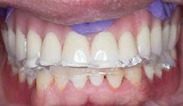
A radiolucent bite registration is required to:
- Establish centric relation
- Prevent denture movement during scanning
- Ensure proper fit of the surgical guide during implant surgery
Bite Registration Procedure
- Place the denture or scan appliance in the patient’s mouth.
- Apply a thin layer of radiolucent bite registration material.
- Guide the patient to close into centric occlusion and hold position while the material sets.
- Trim excess bite registration material.
⚠️ Do not use wax or radiopaque bite registration materials, as this may require additional scans.
Step 3: Radiographic Marker Placement
To fully capture the denture or scan appliance in the CT scan, radiopaque fiducial markers must be placed.
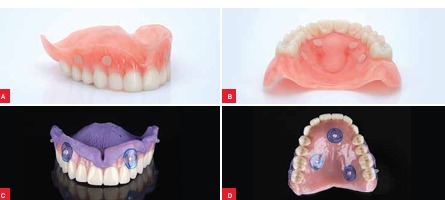
Radiographic Marker Placement Procedure
- Apply 6–8 markers (minimum 6; at least 2 per sextant) using either:
- Radiopaque stickers (e.g., Suremark DentalMark 2.0mm Visionline Ball Stickers)
- Gutta-percha markers (placed in pre-drilled 1mm holes and flush with the denture surface)
Step 4: CT Scan of the Denture (Outside the Mouth)
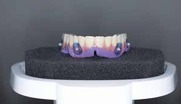
A CBCT scan of the denture alone is required before scanning the patient.
- Place the denture on a foam or Styrofoam block inside the CBCT scanner.
- Position the denture in the center of the field of view (FOV), ensuring that it appears to be floating.
- Scan the denture using the standard CBCT parameters:
- Slice thickness: 0.4–0.5 mm
- Dedicated denture scan protocol (if available)
- Do NOT remove fiducial markers between scans.
⚠️ Do not scan the denture directly on the scanner’s plastic stand, as it can interfere with the image.
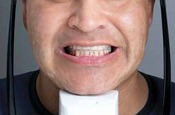
Step 5: CT Scan of the Patient
The second scan captures the patient wearing the denture to align anatomical structures with the prosthesis.
Patient Scan Procedure
- Seat the prepared denture in the patient’s mouth, ensuring correct positioning using the bite registration index from Step 2.
- Instruct the patient to remain still and keep their eyes closed during the scan.
- Scan the patient using CBCT parameters:
- Slice thickness: 0.4–0.5 mm
- Maxillary FOV: Include opposing dentition to the base of the eye
- Mandibular FOV: Include inferior alveolar nerve entrance and exit
- Confirm that the fiducial markers are visible in the scan and that the denture is fully seated.
Step 6: Data Transfer
The final step involves exporting and transferring the scan data for digital treatment planning and surgical guide fabrication.
Data Transfer Procedure
- Export both scans in uncompressed DICOM format.
- Label scans accordingly:
- “Patient” (CBCT scan of the patient wearing the denture)
- “Maxillary Denture” (CBCT scan of the maxillary denture)
- “Mandibular Denture” (CBCT scan of the mandibular denture)
- Submit the scans to Glidewell for digital treatment planning and surgical guide fabrication.
Summary of the Dual-Scan Protocol Workflow
| Step | Procedure |
| Step 1 | Reline the denture if it is poor-fitting to ensure accuracy. |
| Step 2 | Perform radiolucent bite registration to stabilize the denture during scanning. |
| Step 3 | Apply radiographic markers (stickers or gutta-percha) to the denture. |
| Step 4 | Scan the denture alone on a foam block (CBCT scan). |
| Step 5 | Scan the patient wearing the denture in the correct occlusion (CBCT scan). |
| Step 6 | Export and submit DICOM files for digital treatment planning. |
Advantages of the Dual Scan Protocol
- Enhanced Accuracy: Ensures precise visualization of the edentulous jaw and prosthetic design.
- Improved Implant Planning: Facilitates accurate positioning of implants relative to the prosthesis and anatomical landmarks.
- Non-Invasive: Eliminates the need for invasive procedures during impression-taking.
- Efficiency: Streamlines the workflow from imaging to prosthetic design.
- Patient Comfort: Minimizes the need for multiple physical impressions or adjustments.
Applications
- Implant Planning: Helps in determining optimal implant positions for stability and functionality.
- Guided Surgery: Allows for the creation of surgical guides based on the combined 3D model.
- Prosthetic Design: Ensures that final dentures or hybrid prostheses align perfectly with the patient’s anatomical and functional needs.
The dual scan protocol is a valuable innovation, offering clinicians a reliable method to achieve precision and efficiency in the treatment of edentulous patients.
Intraoral Scanning
Intraoral scanning has revolutionized the process of capturing digital impressions for edentulous patients. Unlike conventional impression techniques, intraoral scanners use advanced optical and laser-based technologies to generate highly accurate 3D digital models of the oral cavity. However, the accuracy of intraoral scanning in edentulous cases depends on various scanning principles, including triangulation, confocal imaging, and active wavefront sampling.
Triangulation
- Triangulation is one of the fundamental principles used in optical scanning.
- It involves projecting a laser or structured light onto the tissue surface, which is then reflected back to a sensor at a known angle.
- By measuring the angles and distances between the projected and reflected light, the scanner calculates precise 3D coordinates of the scanned surface.
- This method is effective for capturing detailed textures but may struggle in edentulous cases due to the lack of distinct landmarks.
Confocal Imaging
- Confocal imaging is used in some intraoral scanners to enhance accuracy.
- It relies on filtering reflected light based on specific focal depths, allowing only sharply focused light to be captured while ignoring out-of-focus areas.
- This technique provides high-resolution images with minimal distortion, making it useful for scanning soft tissues and ridges in edentulous patients.
Active Wavefront Sampling
- Active wavefront sampling is a more advanced scanning method used in modern intraoral scanners.
- This technology manipulates the light wavefront actively, capturing multiple focal planes simultaneously.
- It improves scanning accuracy by reducing motion artifacts and enhancing depth perception, which is particularly beneficial in cases where soft tissues or ridges have irregular contours.
Significance in Edentulous Patients
- Higher Precision: Advanced intraoral scanning methods improve the accuracy of soft tissue and ridge morphology capture.
- Faster Data Collection: These technologies speed up the scanning process, reducing patient discomfort.
- Improved Digital Workflow: The digital impressions obtained can be directly integrated into CAD/CAM systems for prosthetic design.
- Minimized Errors: Unlike conventional impressions, which may suffer from material distortion, digital scanning provides more reliable and repeatable results.
Step 3: Data Integration – Merging CBCT and Intraoral Scans in Planning Software
Data integration is a crucial step in the digital workflow for edentulous patients, where CBCT imaging and intraoral scans are combined using specialized treatment planning software. This integration provides a comprehensive, highly accurate 3D representation of the patient’s oral structures, enabling precise diagnosis, implant planning, and prosthetic design.
Process of Data Integration
- Importing CBCT Data
- The CBCT scan is first imported into the planning software, providing a detailed 3D view of the patient’s bone anatomy, including alveolar ridges, bone density, and vital structures like the mandibular nerve and maxillary sinus.
- However, CBCT scans alone do not capture soft tissue details or the prosthetic relationship, necessitating the integration of intraoral scans.
- Importing Intraoral Scans
- The intraoral scan (obtained using triangulation, confocal imaging, or active wavefront sampling) is then imported separately.
- Unlike CBCT, intraoral scans provide a highly detailed representation of the soft tissues, ridge contours, and prosthetic surfaces.
- Aligning and Superimposing the Data
- The software merges the two data sets by aligning common reference points, such as radiopaque markers (from the dual scan protocol), anatomical landmarks, or the prosthesis.
- The integration ensures that the bone structure from the CBCT scan and the soft tissue details from the intraoral scan accurately correspond in 3D space.
- Refining and Adjusting the Model
- Advanced AI-based tools within the software refine the alignment, correcting any discrepancies between the two scans.
- Manual adjustments can also be made to fine-tune the integration, ensuring a precise fit for implant positioning and prosthetic design.
Importance of CBCT and Intraoral Scan Integration
- Accurate Implant Planning: The combined dataset allows for precise implant placement by ensuring optimal positioning relative to the bone and prosthesis.
- Enhanced Prosthetic Design: The integrated model helps in designing custom dentures, implant-supported prostheses, and hybrid restorations that perfectly align with the patient’s anatomy.
- Predictable Treatment Outcomes: The digital workflow reduces errors, ensuring better functional and esthetic results.
- Improved Communication: Seamless data integration allows for better collaboration between clinicians, prosthodontists, and dental labs.
By merging CBCT and intraoral scan data, clinicians can achieve a highly accurate, patient-specific treatment plan, leading to superior outcomes in edentulous patient rehabilitation.
Step 4: Virtual Prosthetic Planning
Virtual prosthetic planning is a critical step in the digital workflow for edentulous patients, ensuring that implant placement is guided by prosthetic requirements rather than solely by bone availability. This prosthetic-driven implant planning approach integrates digital dentures as a reference, optimizing both function and esthetics.
Prosthetic-Driven Implant Planning
In traditional implant planning, the focus was primarily on bone availability, often leading to implants being placed in non-ideal positions for prosthetic function. Prosthetic-driven planning, however, reverses the process, starting with the ideal prosthetic outcome and then determining implant placement accordingly.
Key Steps in Prosthetic-Driven Implant Planning:
- Digital Denture as a Reference
- A scannable denture or a digitally designed prosthesis serves as a reference to determine the optimal tooth position, occlusion, and esthetics.
- The denture scan is merged with CBCT data and intraoral scans, providing a comprehensive guide for implant positioning.
- Establishing the Ideal Occlusal Plane and Vertical Dimension
- The software aligns the digital denture in relation to the patient’s maxillomandibular relationship, ensuring proper function.
- The correct vertical dimension of occlusion (VDO) is established, preventing excessive bite collapse or overextension.
Step 5: Implant Planning
Implant planning for edentulous patients is a crucial step that determines the success of the final prosthetic outcome. The process involves selecting implant positions based on prosthetic needs, choosing the appropriate implant type and size, evaluating bone quality and quantity, and determining whether additional interventions such as sinus lifts, bone grafts, or ridge splits are required.
1. Choosing Implant Position According to Prosthetic Needs
Implants must be strategically placed to support the final prosthesis while ensuring long-term stability, function, and esthetics. Prosthetic-driven implant placement prioritizes the ideal positioning of teeth rather than just following available bone.
Key considerations include:
- Anterior-Posterior (A-P) Spread: Ensuring proper implant distribution to prevent cantilever forces in full-arch restorations.
- Axial Alignment: Implants should be placed in a way that allows a straight and even occlusal load, reducing stress on the prosthesis.
- Number of Implants: Depending on the prosthetic type (fixed vs. removable), a different number of implants may be needed:
- Removable overdenture: Typically requires two to four implants.
- Fixed full-arch prosthesis (All-on-4, All-on-6): Requires four to six implants strategically placed.
- Implant Angulation: In some cases, tilted implants (such as in the All-on-4 technique) help avoid anatomical obstacles like nerves and sinuses while maximizing bone contact.
2. Selecting the Implant Type and Size
The choice of implant type and dimensions depends on the available bone, soft tissue conditions, and prosthetic requirements.
Implant Types
- Standard Implants (3.5mm – 4.5mm diameter): Used in most conventional cases where bone volume is sufficient.
- Wide-Platform Implants (>4.5mm diameter): Used in areas with significant bone volume (e.g., posterior regions) to enhance stability.
- Narrow-Diameter Implants (2.5mm – 3.5mm diameter): Used in areas with reduced bone width or esthetic zones (e.g., lower incisors).
- Zygomatic Implants: Used in cases of severe maxillary atrophy, where traditional implants cannot be placed. These implants anchor into the zygoma (cheekbone) instead of the maxilla.
Implant Length
- Short Implants (<8mm): Used when bone height is limited, reducing the need for bone augmentation.
- Standard-Length Implants (8mm – 12mm): Provide good primary stability and are used in most cases.
- Long Implants (>12mm): Used when additional anchorage is needed, especially in high-load areas.
3. Evaluating Bone Quality and Quantity
The success of implant placement depends on both bone density (quality) and bone volume (quantity).
Bone Quality (Density Classification – Lekholm and Zarb Classification)
CBCT imaging helps assess the bone density at the planned implant sites:
- D1 (Very Dense Bone – Cortical Bone, e.g., Anterior Mandible): Provides excellent primary stability but may require slower drilling to prevent overheating.
- D2 (Dense Bone – Thick Cortical & Some Cancellous Bone, e.g., Posterior Mandible): Ideal for implant placement as it provides both stability and vascularity.
- D3 (Moderate Density – Thin Cortical & More Cancellous Bone, e.g., Anterior Maxilla): Requires implants with a more aggressive thread design for better stability.
- D4 (Soft Bone – Mostly Cancellous Bone, e.g., Posterior Maxilla): May require bone grafting, longer healing times, or wider-diameter implants for improved stability.
Bone Quantity (Available Height and Width)
- Bone Height: If insufficient (e.g., in the posterior maxilla due to sinus proximity), a sinus lift may be required.
- Bone Width: If inadequate, a ridge split or bone grafting may be necessary.
4. Need for Additional Interventions
If bone conditions are not favorable, augmentation procedures may be needed to create an adequate foundation for implant placement.
A. Sinus Lift (Sinus Augmentation)
- Indication: When the bone height in the posterior maxilla is insufficient due to sinus pneumatization.
- Procedure: The maxillary sinus membrane is lifted, and bone graft material is placed beneath it to increase bone volume.
- Healing Time: Requires 4-6 months before implant placement in cases of major augmentation.
B. Bone Grafting
- Indication: Used when there is insufficient bone volume in height or width.
- Types of Grafts:
- Autograft (Patient’s Own Bone): Best healing potential but requires a second surgical site.
- Allograft (Human Donor Bone): Eliminates need for a second surgical site.
- Xenograft (Animal-Derived Bone): Provides a long-lasting scaffold but slower integration.
- Alloplastic Grafts (Synthetic Materials): Biocompatible options that support bone growth.
- Healing Time: Usually requires 3-6 months before implant placement.
C. Ridge Split Technique
- Indication: Used when the ridge width is too narrow to place an implant.
- Procedure: The bone is carefully divided and expanded to create more width for implant placement.
- Advantage: Allows simultaneous implant placement in some cases, reducing treatment time.
Purpose of Surgical Guides
Surgical guides serve several critical functions in prosthetic-driven implant placement, ensuring that implants are placed in the optimal positions dictated by the prosthetic plan.
Key Purposes:
- Accuracy and Precision: Ensures implants are placed exactly as planned, reducing errors.
- Minimally Invasive Surgery: Guides allow for flapless procedures, reducing trauma, swelling, and healing time.
- Reduced Surgical Time: With predetermined drilling positions, surgery is quicker and more efficient.
- Predictable Outcomes: Aligns implant positioning with prosthetic needs, improving function and esthetics.
- Avoids Anatomical Risks: Prevents damage to nerves, sinuses, and adjacent teeth.
- Improved Communication: Enhances coordination between surgeon, prosthodontist, and dental lab.
Types of Surgical Guides
Surgical guides can be classified based on the degree of guidance and support they provide.
1. Based on the Level of Guidance
- Non-Limiting (Pilot Guide): Guides only the first drill (pilot drill), allowing flexibility in the final implant depth and angulation.
- Partially Guided: Guides drilling up to the final depth, but implant placement is done freehand.
- Fully Guided: Controls the entire process, including drilling, depth control, and implant placement.
2. Based on Support Type
- Tooth-Supported Surgical Guide
- Uses existing teeth for support.
- Provides high stability and is commonly used for partially edentulous patients.
- Less invasive, requiring minimal adjustments.
- Mucosa-Supported Surgical Guide
- Rests on soft tissues (gums) and is used for fully edentulous patients.
- Requires CBCT scans with the patient wearing a scannable denture (dual scan protocol).
- Less stable than tooth-supported guides and may require additional fixation pins.
- Bone-Supported Surgical Guide
- Sits directly on the exposed bone after raising a flap.
- Used in cases with severe ridge resorption where mucosa support is unreliable.
- Highly accurate but requires flap surgery, increasing surgical complexity.
Step 3: Designing the Surgical Guide
- The guide is designed around the implant positions and support structures (teeth, mucosa, or bone).
- Openings or sleeves are incorporated to guide the drilling process with precision.
- Fixation pins are added for stability, especially in mucosa- or bone-supported guides.
Step 4: 3D Printing and Fabrication
- Once designed, the guide is 3D printed using biocompatible resin or milled from high-quality materials.
- Post-processing ensures a precise fit and smooth surface to avoid irritation.
Step 5: Sterilization and Pre-Surgical Testing
- The guide is sterilized before surgery.
- A pre-surgical test ensures proper fit and stability before use
Step 7: Surgical Guide Workflow
The surgical guide workflow involves three key phases: fabrication, surgical execution (clinical use during implant placement), and verification during surgery. Each step ensures the precise and accurate transfer of the digital implant plan to the patient’s mouth, optimizing surgical outcomes.
1. Fabrication of the Surgical Guide
A. Digital Design and 3D Printing
- The surgical guide is designed in implant planning software based on the merged CBCT and intraoral scan data.
- The guide includes drill sleeves or channels to direct the osteotomy preparation accurately.
- Fixation pin locations may be incorporated for stability in mucosa- and bone-supported guides.
- The finalized design is exported for 3D printing using biocompatible resin or milled from high-quality materials.
B. Post-Processing and Quality Control
- The printed guide undergoes post-processing, including washing, curing, and polishing, to ensure a smooth surface.
- Fit accuracy is tested on a model or cast to confirm adaptation to the patient’s anatomy.
C. Sterilization
- The guide is sterilized using autoclaving or chemical disinfection before use in surgery.
2. Surgical Execution – Clinical Use of the Guide During Implant Placement
A. Pre-Surgical Preparation
- Patient positioning and anesthesia are administered.
- The surgical guide is placed in the patient’s mouth and checked for a stable fit.
- If required, fixation pins are placed to prevent guide movement.
B. Guided Implant Placement
- Pilot Drilling:
- The initial pilot drill is used through the guide sleeves to establish implant positioning.
- Sequential Osteotomy Preparation:
- Drilling is performed in stages, following the implant manufacturer’s drilling sequence.
- The guide ensures correct depth, angulation, and positioning.
- Implant Insertion:
- The implants are placed directly through the guide (fully guided surgery) or manually after drilling (partially guided surgery).
- Torque values are monitored to ensure primary stability.
C. Immediate or Delayed Loading
- If adequate implant stability is achieved, an immediate prosthesis may be placed.
- Otherwise, healing abutments or covers are positioned for osseointegration before prosthetic placement.
3. Verification During Surgery
A. Fit and Stability Check
- The guide must sit passively and securely on the patient’s mucosa, teeth, or bone.
- If instability is detected, adjustments may be needed before drilling.
B. Verification of Drilling Depth and Angulation
- Depth gauges or radiographic markers are used to confirm the planned implant position.
- Intraoperative CBCT or X-rays may be taken to verify osteotomy and implant alignment.
C. Final Confirmation of Implant Position
- Before finalizing the surgery, a prosthetic verification key may be used to check if the implant positions match the pre-planned design.
- If deviations occur, minor manual corrections can be made during implant insertion.
Step 8: Post-Surgical Workflow
After implant placement, the post-surgical workflow focuses on capturing accurate implant positions for prosthetic fabrication. This can be achieved using two main approaches: conventional impression techniques and digital scanning techniques. Each method ensures that the final prosthesis is well-adapted to the implant positions, providing optimal function and esthetics.
1. Conventional Workflow (Analog Impression Techniques)
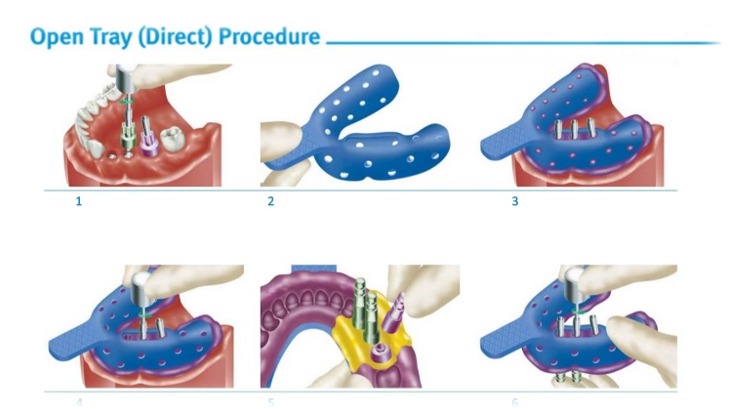
A. Open-Tray Impression Technique
- Best for: Multiple implants, full-arch restorations, or cases requiring high accuracy.
- Procedure:
- A custom open tray with perforations is used.
- The impression material (polyvinyl siloxane or polyether) is applied, and once set, the tray is removed with copings locked inside.
- The lab uses this impression to create an accurate master cast for prosthetic design.
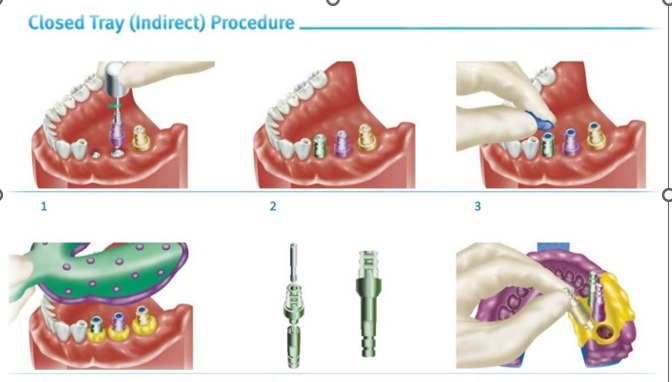
B. Closed-Tray Impression Technique
- Best for: Single implants or cases with sufficient interarch space.
- Procedure:
- Shorter impression copings are used.
- After impression material sets, the tray is removed, and copings remain in the mouth.
- Copings are then removed and repositioned in the impression before sending it to the lab.
Advantages & Disadvantages of Conventional Workflow
- Reliable and widely used.
- High accuracy, especially with the open-tray technique.
- No need for expensive digital equipment.
❌ Disadvantages:
- More time-consuming and technique-sensitive.
- Potential for distortion in material handling.
- Multiple patient visits required.
2. Digital Workflow (Intraoral Scanning Techniques)
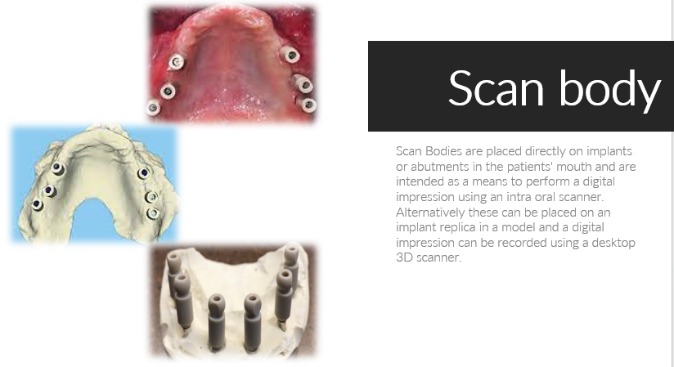
- Scan bodies (special implant attachments) are placed on the implants.
- An intraoral scanner captures a highly precise digital impression of the implant positions.
- The scanned data is directly integrated into CAD/CAM software for prosthetic design.
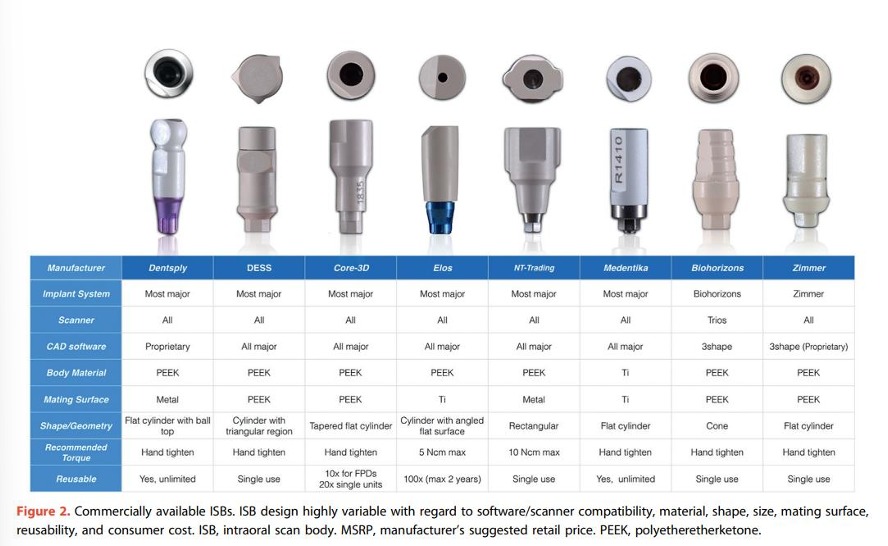
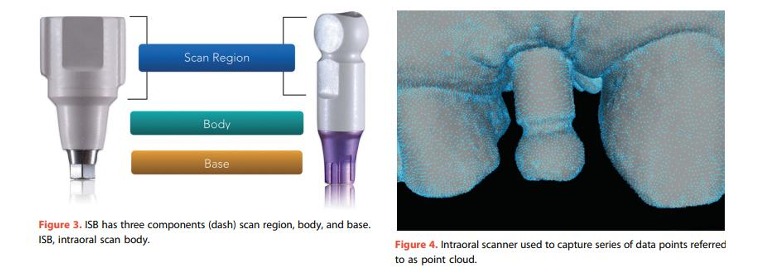
- The first scannable impression copings were released shortly afterward and were termed scan bodies by the Straumann Group. Initially, these scan bodies were commercially available only for a single-implant system and required a specific scanner and scanning technology (Itero, parallel confocal microscopy). As scanner technology has improved and gained popularity, however, so has the design and usage of scan bodies. Today, almost all major implant manufacturers offer scannable impression copings, as do numerous dental laboratories and dental implant accessary companies. Commercial ISB design is highly variable with regard to material, shape, size, surface, connection, reusability, software/ scanner compatibility, and cost (Fig. 2).10
B. Photogrammetry Technique

- Photogrammetry systems capture implant positions without requiring scan bodies.
- It is the most precise method for full-arch implant restorations.
Advantages & Disadvantages of Digital Workflow
✅ Advantages:
- Faster and more efficient than conventional impressions.
- No material distortion or repositioning errors.
- Photogrammetry is highly accurate, especially in full-arch cases.
- Seamless integration with CAD/CAM technology for immediate prosthetic fabrication.
❌ Disadvantages:
- Requires specialized equipment (expensive investment).
- Not all clinics have access to photogrammetry systems.
Step 9: Abutment Selection
Abutment selection is a critical step in implant prosthetics, as it serves as the connection between the implant and the final prosthesis. The choice of abutment affects stability, function, esthetics, and long-term success of the restoration. There are various types of abutments, each designed for specific clinical situations.
1. Types of Abutments and Their Uses
A. Stock Abutments (Prefabricated Abutments)
- Description:
- Manufactured in standard sizes and shapes by implant companies.
- Available in different heights, angulations, and diameters.
- Uses:
- Suitable for cases with ideal implant positioning and sufficient tissue height.
- Often used for single-unit restorations.
- Advantages:
- Cost-effective and readily available.
- Less chair-side time required.
- Disadvantages:
- May not provide an ideal emergence profile in complex cases.
- Limited customization for esthetic zones.
B. Custom Abutments
- Description:
- Designed specifically for a patient using CAD/CAM or laboratory fabrication.
- Allows for customized height, angulation, and emergence profile.
- Uses:
- Used in cases where implants are placed at angulated positions.
- Preferred for anterior esthetic cases.
- Suitable for full-arch or complex restorations.
- Advantages:
- Optimized fit and esthetics.
- Provides better soft tissue support and emergence profile.
- Can correct minor implant angulation issues.
- Disadvantages:
- Higher cost compared to stock abutments.
- Requires additional fabrication time.
C. Angled Abutments
- Description:
- Prefabricated abutments with pre-set angulations (15°, 25°, 30°).
- Uses:
- Used when implants are not ideally positioned due to anatomical limitations.
- Helps correct implant angulation in cases where straight abutments are not feasible.
- Advantages:
- Avoids the need for surgical correction of implant position.
- Improves prosthetic alignment in challenging cases.
- Disadvantages:
- Not as customizable as fully CAD/CAM abutments.
D. Multi-Unit Abutments (MUA)
- Description:
- Used in full-arch restorations (All-on-4, All-on-6).
- Allows for better load distribution in multiple-implant cases.
- Uses:
- Used for screw-retained full-arch restorations.
- Helps align implants for passive fit of prostheses.
- Advantages:
- Allows for easy retrievability of prostheses.
- Reduces stresses on implants in full-arch cases.
- Disadvantages:
- Higher cost compared to standard abutments.
E. Healing Abutments
- Description:
- Temporary abutments used to shape soft tissues after implant placement.
- Uses:
- Placed after surgery to promote proper gingival contouring before final prosthetic placement.
- Advantages:
- Improves soft tissue healing around the implant.
- Disadvantages:
- Requires replacement with definitive abutments before final restoration.
F. Temporary Abutments
- Description:
- Used to support provisional crowns during the healing phase.
- Uses:
- Helps in provisional restorations while waiting for final prosthesis.
- Advantages:
- Allows for functional and esthetic testing before the definitive restoration.
- Disadvantages:
- Not suitable for long-term use.
G. UCLA Abutments (Castable Abutments)
- Description:
- Metal or plastic abutments that can be custom-cast in the dental lab.
- Uses:
- Used for complex implant cases that require custom prosthetic designs.
- Advantages:
- Offers maximum customization.
- Disadvantages:
- More time-consuming and requires laboratory fabrication.
2. Choosing the Right Abutment
| Clinical Scenario | Recommended Abutment Type |
| Ideal implant position, cost-effective option | Stock Abutment |
| Anterior esthetics, soft tissue support | Custom CAD/CAM Abutment |
| Correcting angulated implants | Angled Abutment |
| Full-arch restorations (All-on-4, All-on-6) | Multi-Unit Abutment (MUA) |
| Immediate post-surgery tissue shaping | Healing Abutment |
| Provisional restorations | Temporary Abutment |
| Complex cases requiring lab fabrication | UCLA Abutment |
Step 10: Fabrication of Prosthesis – Materials and Delivery
The final step in the implant workflow for edentulous patients is the fabrication and delivery of the prosthesis. This stage involves selecting the appropriate prosthetic materials, designing the restoration, and ensuring proper fit, function, and esthetics at the time of delivery.
1. Prosthetic Material Selection
The choice of material depends on factors such as patient expectations, occlusal forces, durability, and esthetics.
A. Full-Arch Prosthesis Material Options
| Material | Description | Pros | Cons |
| Acrylic Resin (PMMA – Polymethyl Methacrylate) | Used for interim or definitive prostheses; commonly supported by a metal framework. | Lightweight, cost-effective, easy to repair, good esthetics. | Less durable, susceptible to wear and fracture. |
| Hybrid Prosthesis (Acrylic over Titanium Bar) | Acrylic denture with a titanium or cobalt-chromium framework. | Stronger than full acrylic, reduces fractures, good adaptation to implant bars. | Can wear over time, requires periodic maintenance. |
| Zirconia Full-Arch Prosthesis | Monolithic zirconia or layered zirconia. | Highly esthetic, extremely durable, excellent strength, stain-resistant. | Expensive, heavier than acrylic, difficult to adjust or repair. |
| PEEK (Polyether Ether Ketone) | High-performance polymer used as a metal-free alternative. | Lightweight, biocompatible, flexible, shock-absorbing. | Less esthetic than zirconia, not as rigid as metal-supported restorations. |
| Metal-Ceramic (Porcelain-Fused-to-Metal – PFM) | Ceramic veneered onto a metal framework. | Esthetically superior to full metal, strong, and durable. | Can chip (ceramic fractures), heavier than acrylic. |
2. Fabrication Workflow
The fabrication of the final prosthesis follows a structured CAD/CAM digital workflow or traditional laboratory fabrication.
A. Digital Workflow (CAD/CAM Prosthesis)
- Digital Impression:
- Intraoral scanning or photogrammetry captures implant positions.
- CAD Design:
- The prosthesis is digitally designed in CAD software based on occlusion, esthetics, and function.
- CAM Milling or 3D Printing:
- The final prosthesis is milled (zirconia, titanium, PEEK) or 3D printed (PMMA prototypes).
- Final Finishing & Characterization:
- Staining and polishing are done to improve esthetics.
- Final Quality Control & Testing:
- The prosthesis is checked for fit, bite alignment, and patient comfort before delivery.
B. Conventional Workflow (Lab-Fabricated Prosthesis)
- Master Cast Creation:
- Impressions are used to create a stone model of the implant positions.
- Wax Try-In (For Esthetic & Functional Approval):
- A wax mock-up is tested in the patient’s mouth before finalizing the material.
- Metal or Framework Fabrication:
- For hybrid or metal-supported prostheses, a titanium or cobalt-chromium framework is fabricated.
- Final Prosthesis Processing:
- Acrylic, ceramic, or zirconia is added to the framework and processed.
- Finishing & Final Adjustments:
- The prosthesis is polished, stained, and checked for occlusion before delivery.
3. Prosthesis Delivery Protocol
A. Try-In and Fit Verification
- The prosthesis is placed on the implants to check for:
- Passive fit – Ensuring no excessive pressure on implants.
- Tissue adaptation – No soft tissue impingement.
- Occlusion – Proper bite alignment to prevent excessive forces.
B. Screw-Retained vs. Cement-Retained Prosthesis
- Screw-Retained Prosthesis:
- Preferred for full-arch and implant-supported restorations.
- Easily retrievable for maintenance.
- Cement-Retained Prosthesis:
- Used in esthetic zones for single-unit restorations.
- Difficult to retrieve, risk of cement-related peri-implantitis.
C. Occlusal Adjustments & Function Testing
- Any high spots are adjusted to ensure a balanced bite.
- Patient performs chewing and speech tests to check functional adaptation.
D. Patient Instructions & Maintenance Guidance
- Oral hygiene routine: Cleaning protocols for implant-supported restorations.
- Follow-up visits: Regular monitoring of implant health, prosthesis wear, and occlusion.
- Soft diet recommendation: In the initial adaptation phase for full-arch prostheses.
Step 11: Patient Follow-Up – Post-Operative Care
Post-operative care is essential to ensure implant success, tissue healing, and prosthesis longevity. Regular follow-up visits allow clinicians to monitor the healing process, implant stability, soft tissue health, and prosthetic function.
1. Immediate Post-Operative Care (First 24-72 Hours)
A. Pain and Swelling Management
- Pain Control: Prescribe NSAIDs (Ibuprofen 400-600mg) or acetaminophen as needed.
- Swelling Reduction: Apply cold compresses for the first 24 hours to minimize swelling.
- Avoid Strenuous Activity: Rest is advised to prevent excessive bleeding or implant movement.
B. Bleeding Control
- Minor bleeding is normal; patients should bite on gauze for 30-60 minutes post-surgery.
- Avoid spitting, sucking through a straw, or vigorous rinsing to prevent clot disruption.
C. Oral Hygiene Instructions
- First 24 hours: No brushing or rinsing around the surgical site.
- After 24 hours: Use a chlorhexidine mouth rinse (0.12%) twice daily to prevent infection.
- Soft brushing can begin after 3-5 days, avoiding direct contact with implants.
D. Dietary Restrictions
- Soft diet for at least 1-2 weeks to prevent excessive pressure on implants.
- Avoid hot, spicy, hard, or sticky foods that could disturb the surgical site.
2. Short-Term Follow-Up (First 1-2 Weeks)
A. First Follow-Up Visit (7-10 Days Post-Surgery)
- Check soft tissue healing for signs of infection, swelling, or dehiscence.
- Suture removal (if non-resorbable sutures were used).
- Confirm patient comfort and address any pain or swelling concerns.
B. Monitoring of Healing Abutments (If Placed)
- Ensure proper tissue healing around healing abutments.
- Check for tissue overgrowth or irritation.
3. Mid-Term Follow-Up (3-6 Months – Osseointegration Phase)
A. Second Follow-Up Visit (3-4 Weeks After Surgery)
- Evaluate early osseointegration progress (especially in delayed loading cases).
- Monitor for inflammation or implant mobility (signs of failure).
B. Osseointegration Check (3-6 Months Post-Surgery)
- Conduct radiographic assessment (periapical X-ray or CBCT) to confirm bone healing around the implants.
- Test implant stability using a torque test or resonance frequency analysis (RFA) before proceeding to prosthetic loading.
4. Long-Term Follow-Up (After Prosthesis Placement)
A. Regular Maintenance Appointments
- Every 3-6 months:
- Professional implant cleaning using non-abrasive instruments.
- Assess gingival health, occlusion, and prosthetic fit.
- Check for signs of peri-implantitis (infection) or prosthesis wear.
- Annually: CBCT or periapical X-rays to monitor bone levels and implant stability.
B. Occlusal Adjustments
- Evaluate occlusion and adjust if excessive forces are detected.
- Reduce parafunctional habits (e.g., bruxism) with a nightguard if needed.
C. Patient Education on Long-Term Care
- Regular flossing/interdental brushing with implant-friendly tools.
- Avoid smoking, which increases the risk of implant failure.
- Importance of routine dental visits to maintain implant health.
