Digital Complete Dentures (3D-Printed Bases + Bonded Teeth): Clinical & Lab Step-by-Step Protocol
How do you carry a complete denture from clinical records to a printed base with bonded teeth without carrying an error into the final prosthesis?
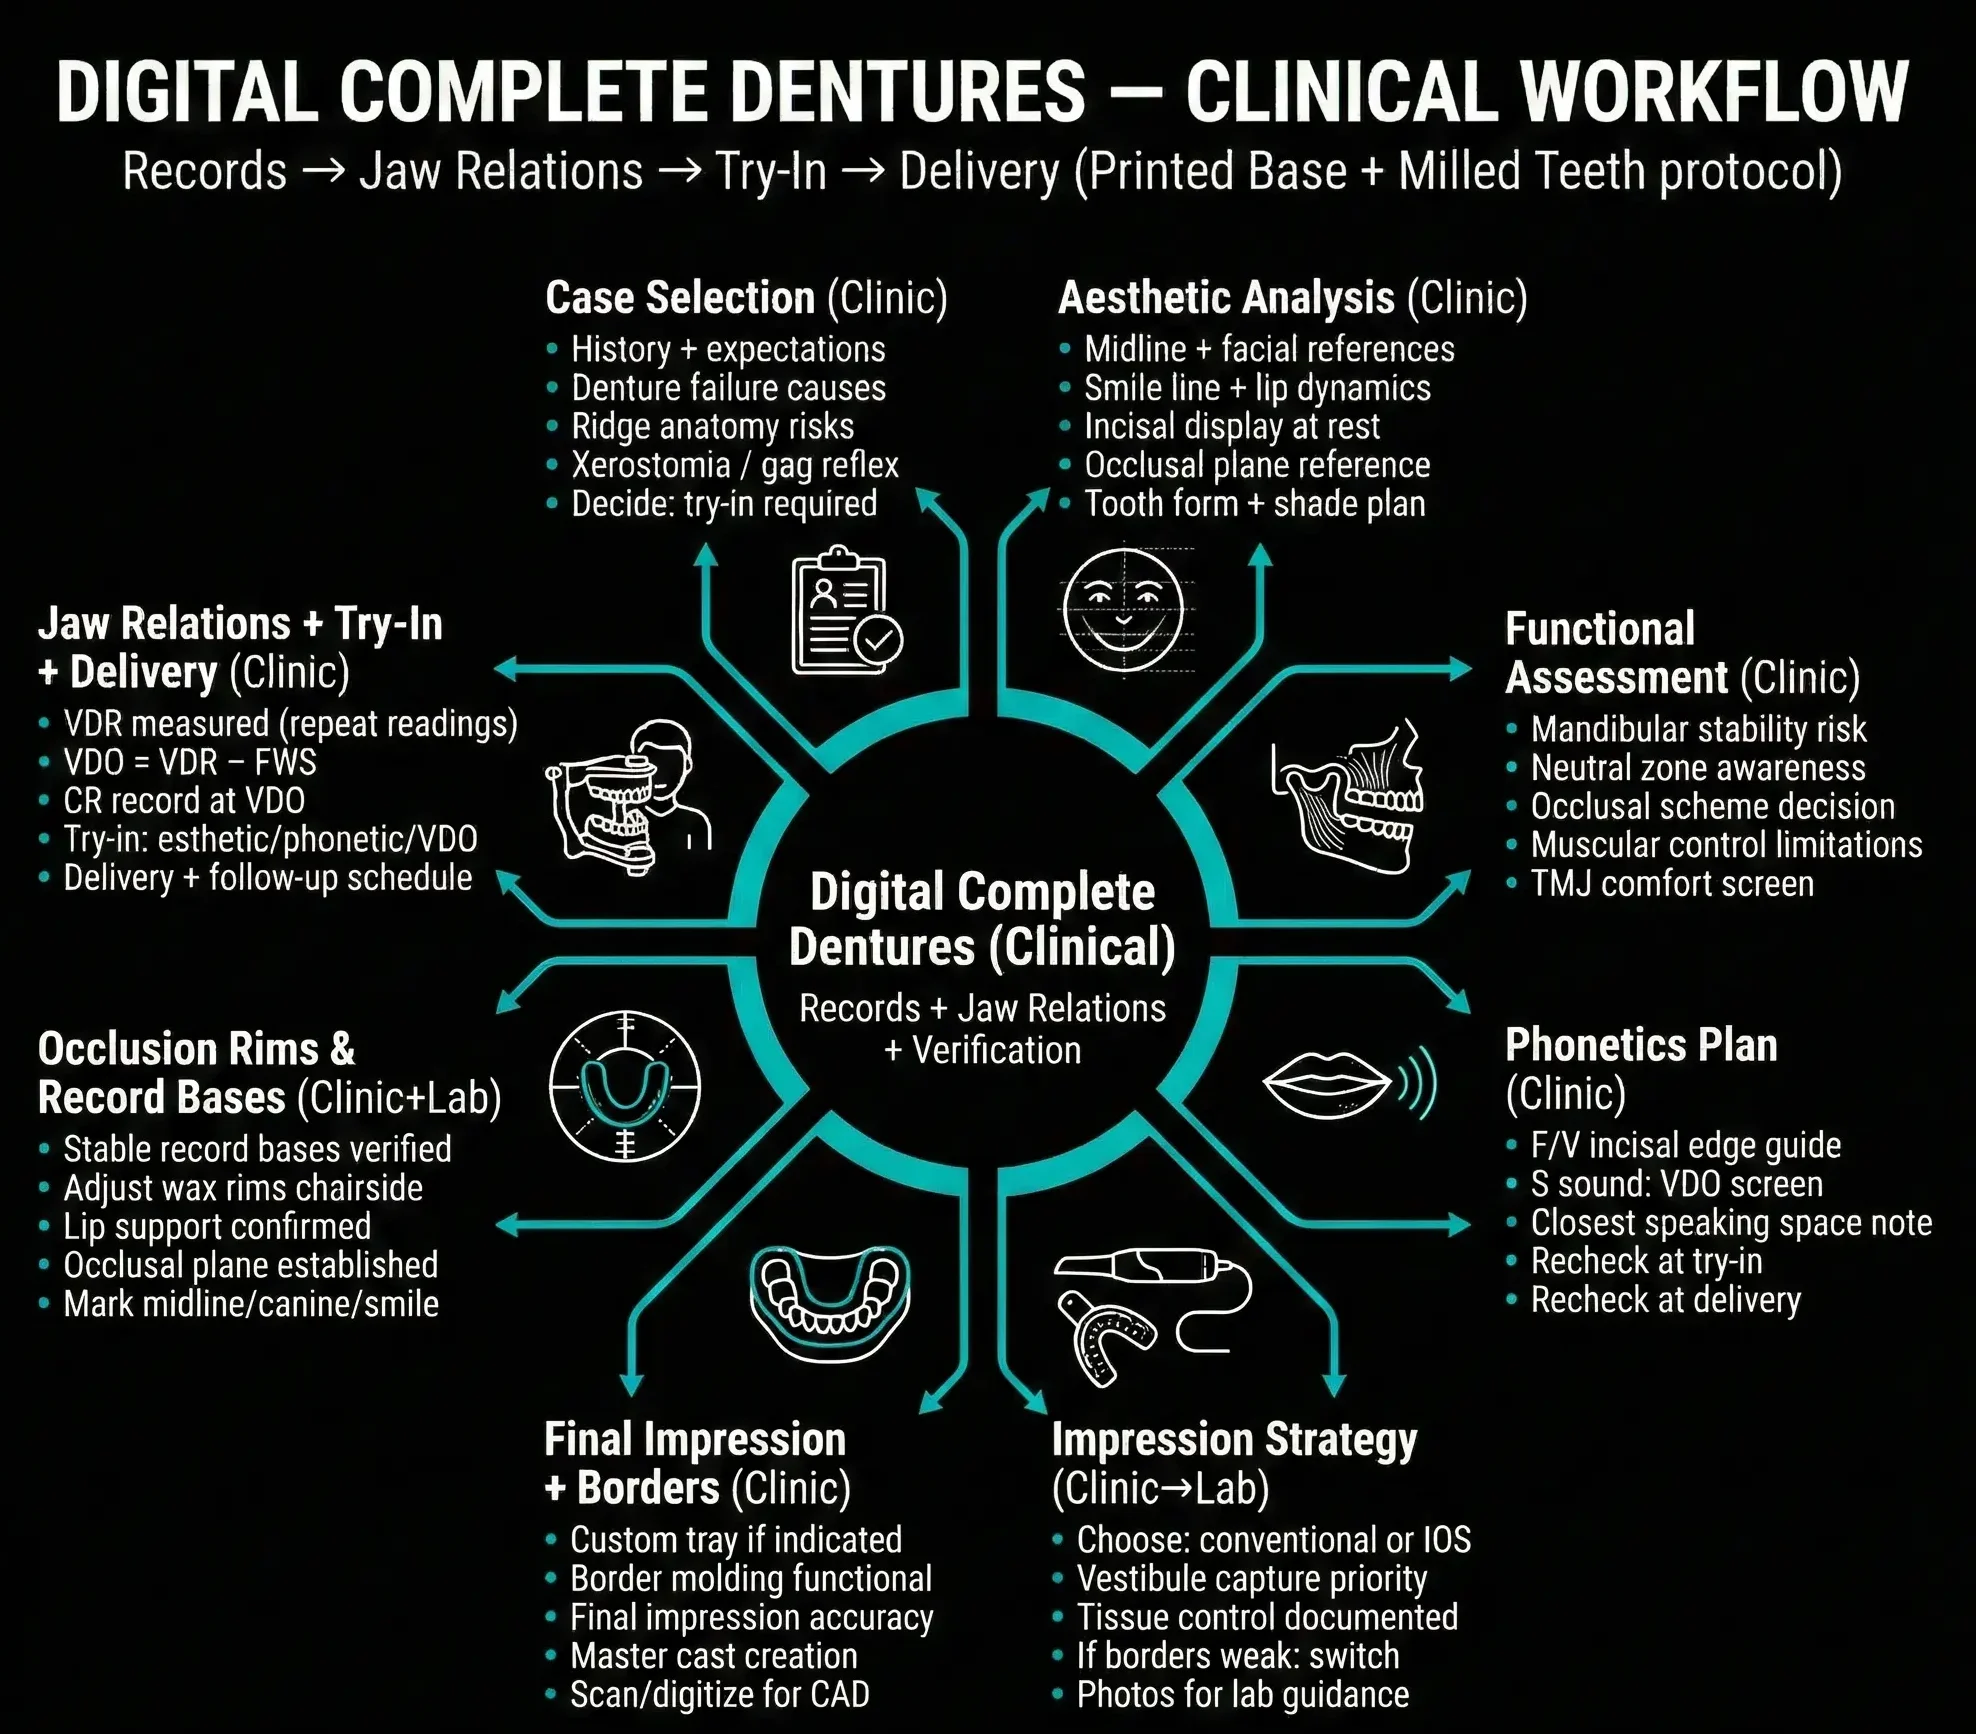
Follow the same question at each handoff: what has been checked in the mouth, and what still needs checking? This guide connects the impression, jaw relation, CAD setup, try-in and final assembly. CR means centric relation; VDO means occlusal vertical dimension. Use the clinical mind map below to see the sequence, then work through the checkpoints before moving to the next stage.
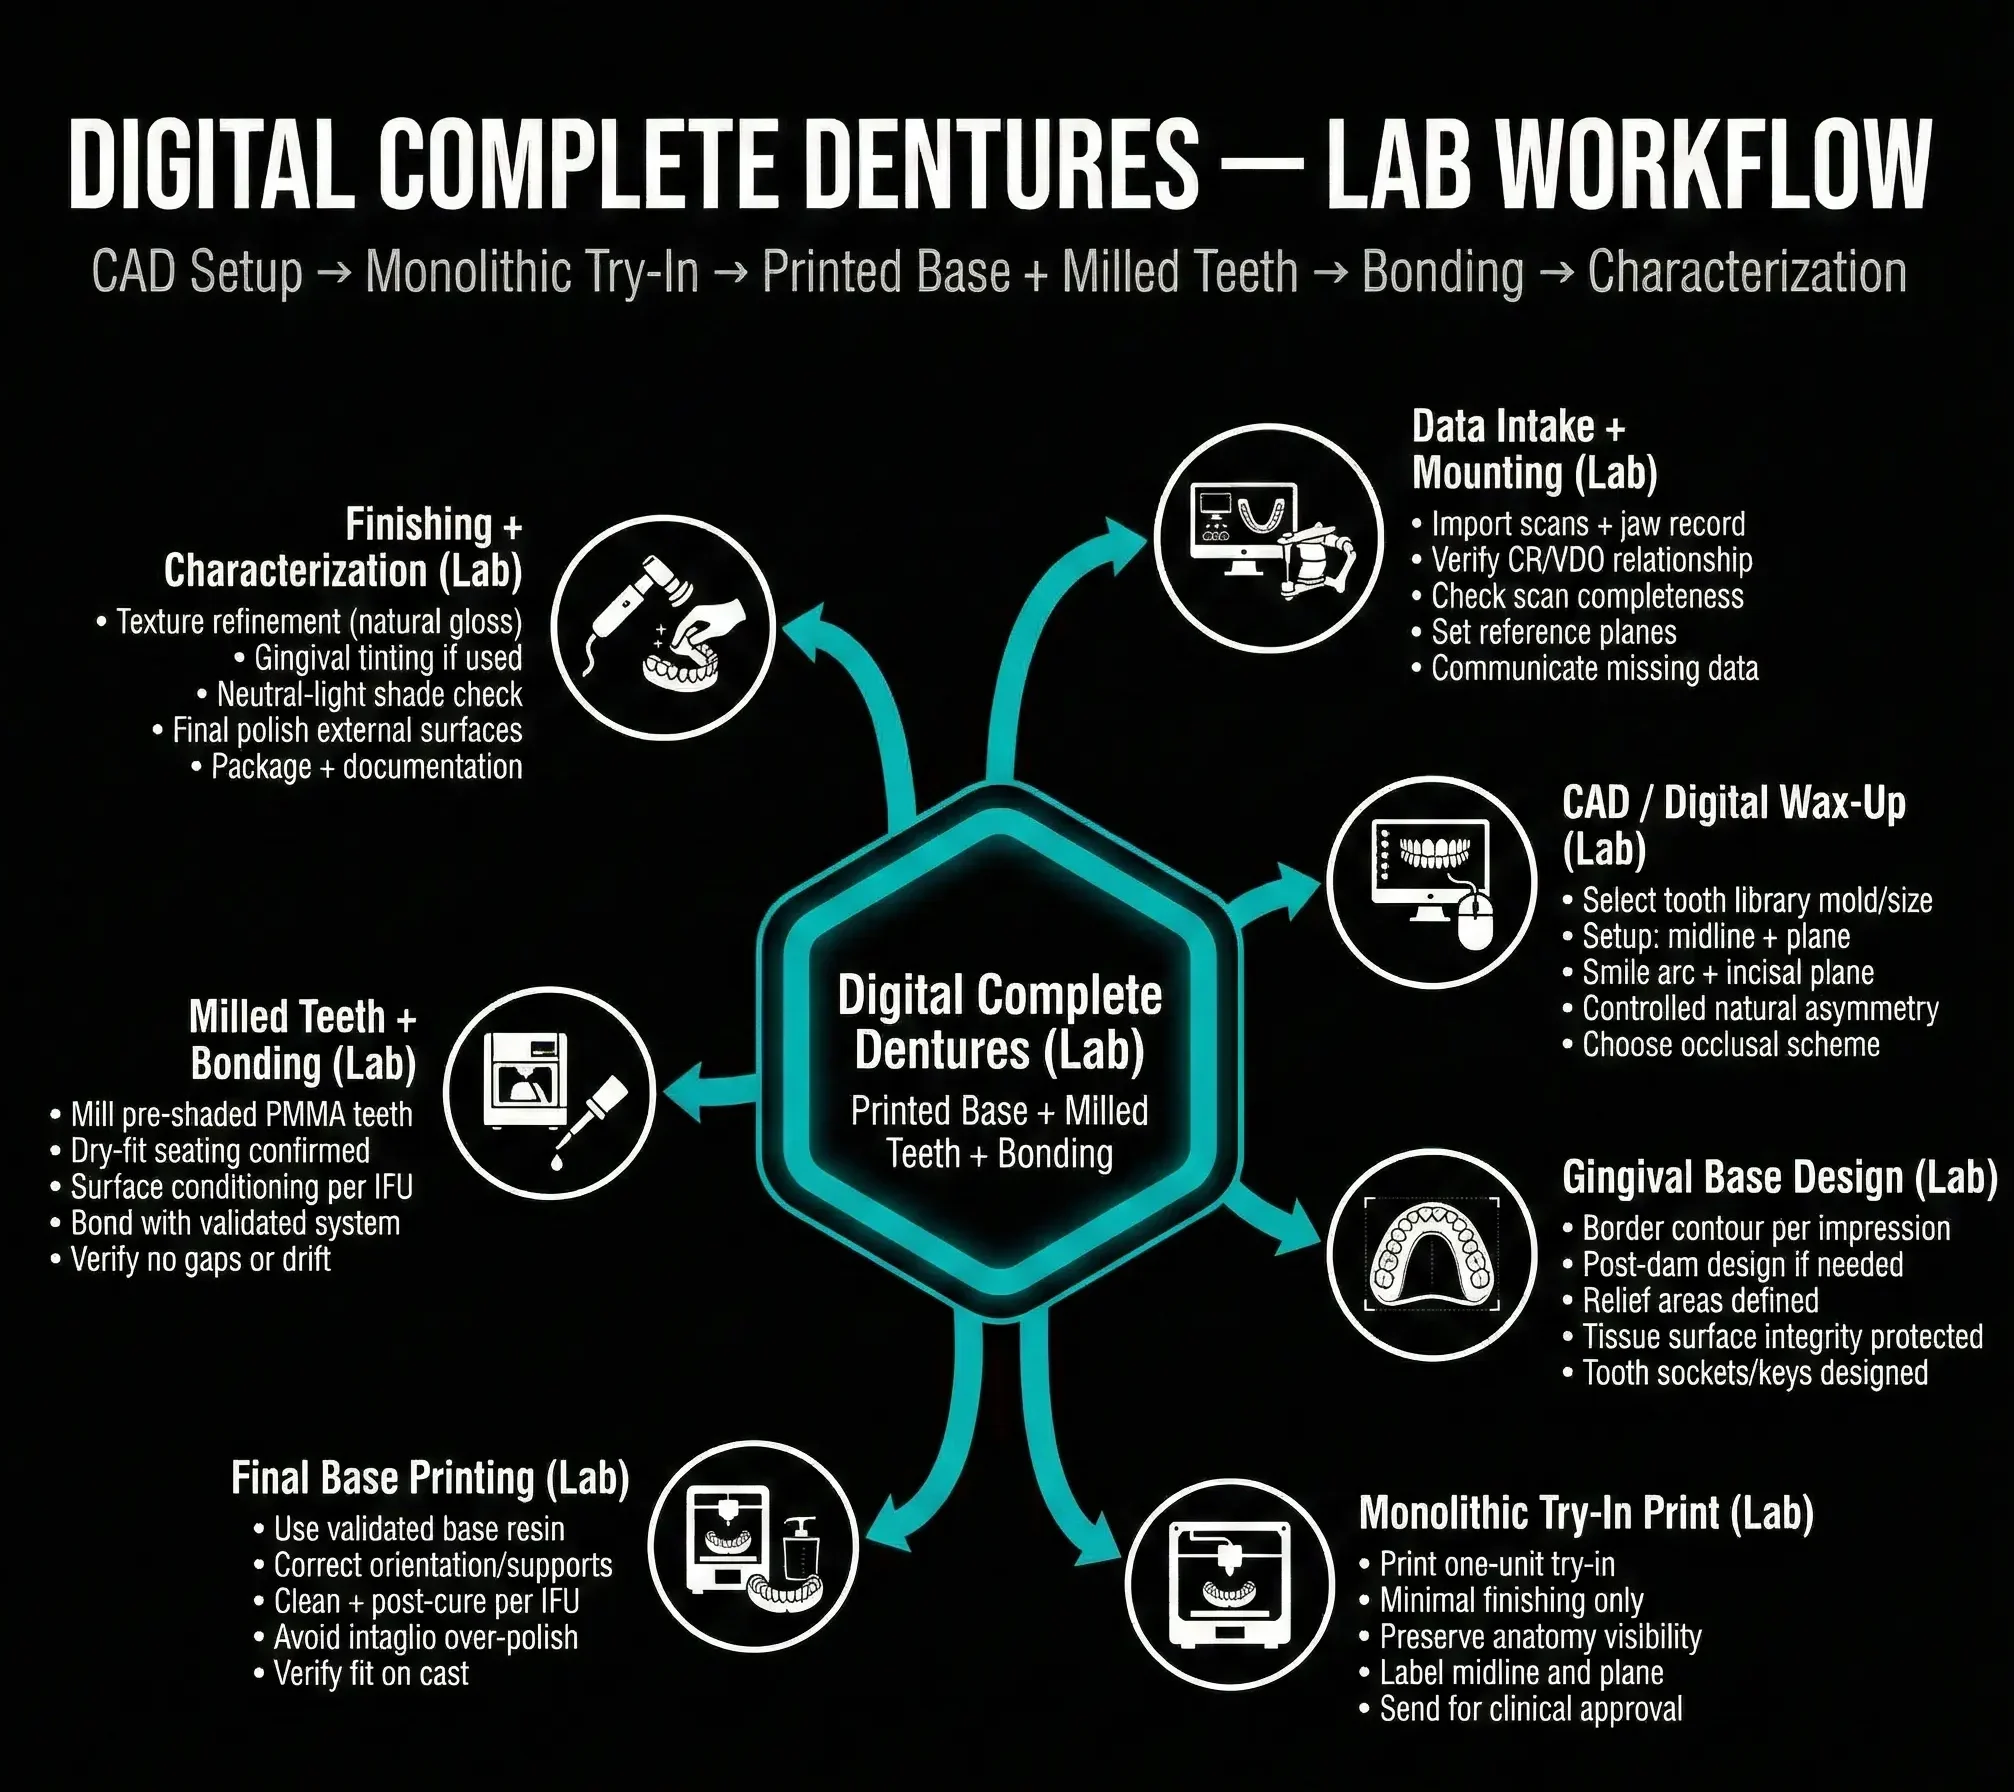
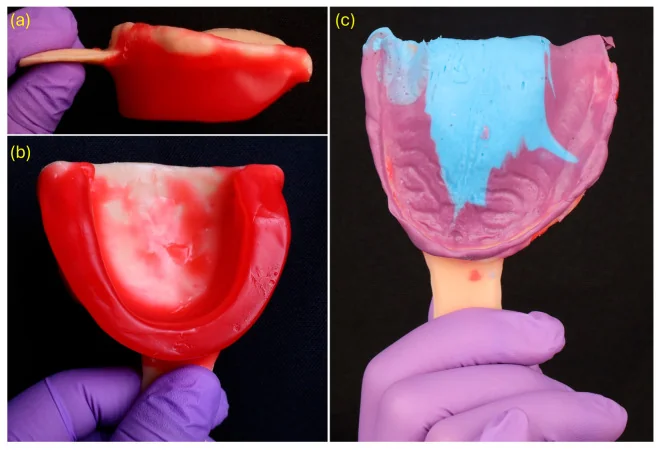
The intended pathway here is a 3D-printed base with separately milled PMMA teeth. The published figures illustrate related printed and milled denture workflows; they do not show one continuous patient or validate every base, tooth and bonding combination. Each caption identifies its source.
For manufacture, confirm that the selected materials and bonding procedure are compatible in the relevant manufacturers' instructions for use (IFUs). This educational guide does not replace those product-specific instructions.
What needs verifying before you choose the workflow?
Good candidates for digital complete dentures
- Stable ridges and manageable soft tissues
- Patients prioritizing reproducibility and documented records
- Cases requiring predictable tooth setup and controlled esthetic characterization
Risk flags (plan extra verification)
- Severely resorbed mandibular ridge, unstable lower denture history
- Flabby ridge / mobile mucosa, high frena, shallow vestibules
- Xerostomia, neuromuscular control limitations, strong gag reflex
- High esthetic demand, uncertain phonetics, unclear VDO tolerance
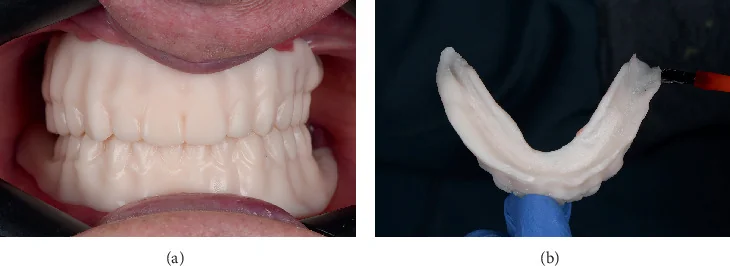
Use the try-in to resolve the clinical questions that remain before definitive manufacture. In Luna-Domínguez and colleagues' maxillary denture case, the printed trial was adjusted for occlusion, esthetics and phonetics before the definitive milled prosthesis. This illustrates a verification step, not a guaranteed reduction in visits or remakes.
How do the clinic and laboratory carry the same record forward?
Read the sequence as a chain of clinical decisions, rather than a fixed appointment count. First establish the supporting tissues and jaw relationship; then transfer the checked record into CAD, test the proposed setup, and manufacture the approved design.
Visit 1 (Clinic): Diagnostic baseline + Primary acquisition
- Medical/dental history + expectations: previous denture failures, adaptation issues, esthetic priorities.
- Ridge and tissue exam: undercuts, flabby ridge, frenal attachments, vestibular depth, saliva quality.
- Esthetic references: full-face at rest + full smile, profile for lip support, close-up retractor views.
- Functional/phonetic screen: baseline F/V and “S” sound notes (for later VDO verification).
- Primary acquisition pathway: IOS (if reliable borders) or preliminary impression for tray workflow.
Lab Phase 1 (Lab): Custom tray + record base strategy
- If borders are uncertain: fabricate a custom tray (printed or conventional) for true border molding.
- Plan how you will produce stable record bases (often printed) to carry wax rims without rocking.
- Prepare rim design approach that supports lip support, plane control, and repeatable jaw relation recording.
Visit 2 (Clinic): Final impression + occlusion rims verification + jaw relation (CR + VDO)
Do not record CR before the rim is clinically verified. If the rim is wrong, your CR/VDO record will be wrong—then CAD is wrong.
A) Border molding and final impression (if not already confirmed)
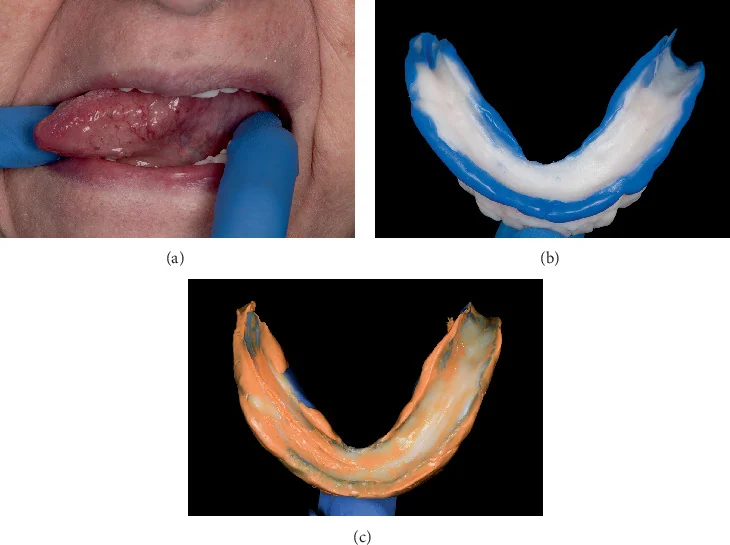
- Border mold to capture vestibular function and flange extension.
- Take final impression with a strategy matching tissue behavior (mucostatic vs selective pressure—case dependent).
- Communicate specific relief zones (flabby ridge, sharp crest, tori).
B) Occlusion rims verification (occlusion block try-in)
- Base stability: minimal rocking; borders comfortable (no overextension trauma).
- Lip support: confirmed with profile and rest position.
- Occlusal plane: oriented to facial references (case-appropriate plane assessment).
- Incisal display: at rest and smile; confirm midline and canine guides.
- Phonetics: F/V for incisal edge position; “S” for closest speaking space (VDO screening).
C) Jaw relation record protocol (CR at verified VDO)
- Measure VDR (repeat readings; use a consistent method).
- Use VDR and individualized freeway-space assessment as part of VDO selection; confirm with clinical references, comfort and phonetics.
- Record CR at the selected VDO using stable rim contact (avoid rim slide).
- Repeatability check: at least 2 consistent closures before locking the record.
- Indexing: notches/grooves to prevent record shift during scanning/digitization.
- Send/scan rims in relation for lab mounting (plus reference photos and notes).
Lab Phase 2 (Lab): Digitization + CAD setup + tooth characterization plan
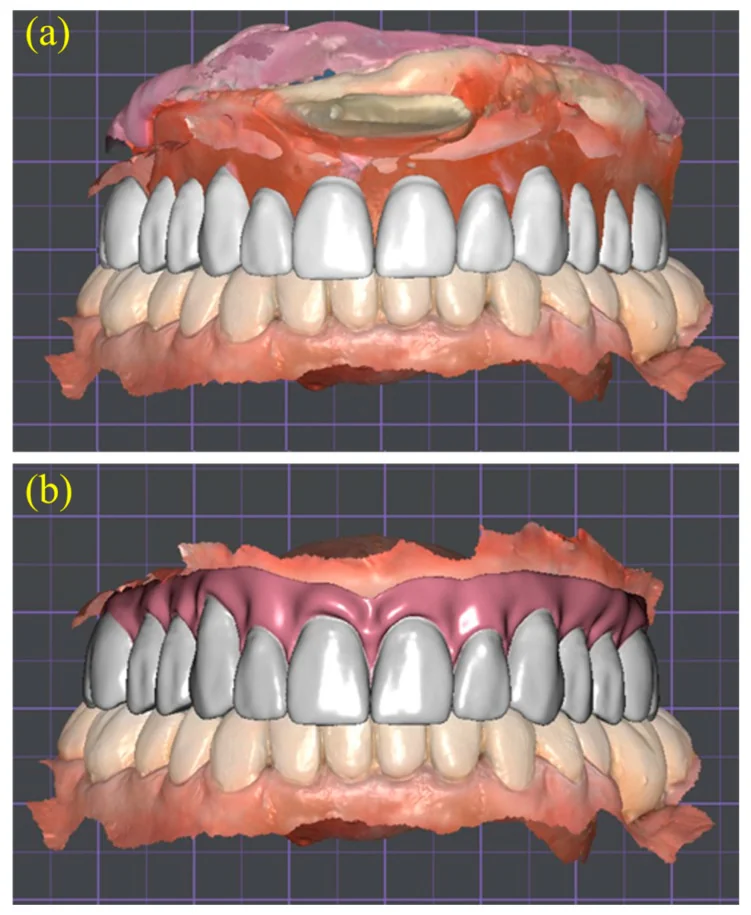
The laboratory needs a reference it can trace back to the clinical assessment. In Luna-Domínguez and colleagues' case, the team marked the midline, canine guides and smile line on the rim, verified VDO, and rescanned the tray–rim assembly for virtual articulation. The CAD figure below shows that same source case's tooth arrangement; its definitive base was milled.
- Digitize master casts/models and record rims in relation.
- Mount digitally according to the verified CR/VDO record.
- Define the occlusal scheme appropriate for ridge stability and neuromuscular control (case-based).
- Plan tooth selection and characterization using clinical references (avoid over-idealized symmetry).
Visit 3 (Clinic): Try-in (recommended) + approval
- Use a monolithic printed try-in to validate: esthetics, phonetics, midline/canine lines, plane, VDO comfort, stability.
- Approve or revise with specific change requests (e.g., “+1 mm incisal display”, “reduce buccal corridor fullness”, “adjust smile arc”).
Lab Phase 3 (Lab): Final manufacturing — printed base + milled teeth + bonding
1) Print the final denture base (validated base resin)
- Follow manufacturer IFU for printing, cleaning, and post-curing.
- Protect intaglio accuracy: do not over-polish tissue surface.
- Verify fit on master cast; confirm borders and posterior palatal seal design (if indicated).
2) Fabricate teeth separately (milled PMMA teeth in this pathway)
- Select denture-indicated milled PMMA teeth and finish them according to the selected system’s instructions.
- If printed teeth are used, ensure they are validated for denture teeth indication and compatible bonding protocol.
3) Bonding (system-dependent — follow IFU)
- Surface conditioning per IFU (base + teeth).
- Use designed mechanical retention (sockets/keys) plus validated chemical bond.
- Confirm full seating, no gaps, and no positional drift before final cure/finish.
- Remount/verify occlusion after bonding for final refinement.
Delivery (Clinic): Insertion + refinement + follow-up
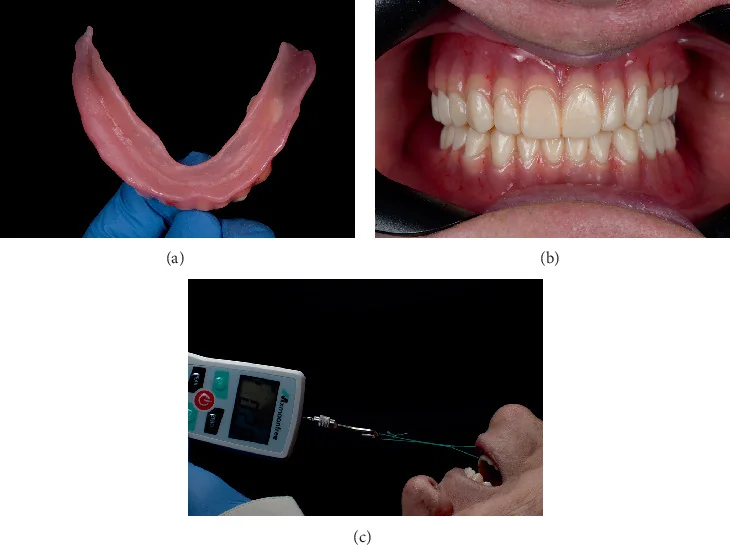
- Pressure indicator evaluation: relieve selective areas without flattening the base.
- Border comfort and retention check; refine overextensions conservatively.
- Occlusion verification and selective adjustments according to the planned scheme.
- Hygiene + adaptation instructions; schedule follow-up (24–72h, then 1–2 weeks).
What should you check in exocad before export?
For the named software workflow, see the official exocad DentalCAD FullDentureModule product information. Software capability does not establish clinical suitability or material compatibility; confirm the selected library, manufacturing route and current material IFUs.
1) Data import and mounting (do not “guess” CR/VDO)
- Import edentulous scans + jaw relation record (rims in relation).
- Confirm orientation: midline, occlusal plane, smile references from photos.
- Set articulation parameters consistent with the selected occlusal concept (case-based).
2) Tooth selection and setup (characterization starts here)
- Select mold/size based on facial references and clinical notes (avoid “one-mold fits all”).
- Establish: midline, canine lines, incisal plane, smile arc, and buccal corridor control.
- Build natural realism: micro-rotations, embrasures, line angles—without creating instability.
- Keep symmetry controlled: symmetry is a guideline, not an aesthetic goal.
3) Occlusion concept (choose based on ridge stability)
- Case-based selection: balanced / lingualized / monoplane (document why).
- Protect unstable mandibular bases from excessive lateral interferences.
- Check collisions and contacts digitally, then plan how you will verify clinically at delivery.
4) Base design for the printed-base + bonded-teeth workflow
- Design tooth sockets/keys to prevent drift during bonding.
- Control base thickness in functional zones; protect borders and frena.
- Plan relief areas (sharp crest, thin mucosa, tori) and post-dam where indicated.
5) Output & manufacturing handoff
- Export separate components (base + teeth) according to your workflow.
- Ensure your printer/mill settings and materials are validated for dentures.
- Document orientation and post-cure requirements (IFU) as part of the case file.
Before revising the tooth setup, compare the CAD mounting with the recorded jaw relationship and the approved try-in. In the published maxillary case, the adjusted try-in was rescanned and superimposed on the original dataset before the final design. That makes the clinical correction traceable rather than leaving the laboratory to infer it.
What must pass before you move to the next stage?
Practical checkpoint panel: review these six handoffs with the clinical and laboratory teams. If a check is unresolved, return to that stage before proceeding.
- QC 1 (Clinic – Visit 2): borders complete, base stable, lip support/plane verified, phonetics screened.
- QC 2 (Clinic – Visit 2): VDR repeatable, VDO verified, CR recorded at VDO, record indexed (no slip).
- QC 3 (CAD): midline/smile arc/incisal plane confirmed; occlusal scheme documented; sockets/keys designed for bonding.
- QC 4 (Try-in): esthetics + phonetics + VDO comfort + stability approved (or revisions documented).
- QC 5 (Post-bond): full tooth seating, clean interfaces, no drift, remount occlusion verified.
- QC 6 (Delivery): pressure areas relieved, borders comfortable, occlusion refined, follow-up scheduled.
Which errors should you look for first?
- Skipping rim verification: recording CR/VDO on an unstable rim = unstable dentures.
- Under-captured borders: relying on IOS when vestibules/borders are incomplete.
- Over-polishing intaglio: destroying tissue surface accuracy and retention.
- Over-idealized symmetry: prioritizing symmetry over the patient’s esthetic references and planned occlusion.
- Bonding drift: no mechanical keys + weak seating control = tooth position changes.
- No remount verification: occlusion errors discovered chairside instead of in lab QC.
FAQs
Are printed bases and bonded teeth clinically acceptable for digital complete dentures?
A printed-base and separately manufactured tooth workflow requires denture-indicated materials and a compatible, manufacturer-validated bonding protocol. The two illustrated case reports used different manufacturing combinations, so they do not establish outcomes for every printed-base/milled-tooth combination. Clinical records and assessment remain essential.
Do I still need occlusion rims and jaw relation records in a digital workflow?
Yes. Digital complete dentures still depend on verified occlusal plane, lip support, and repeatable maxillomandibular records. CAD improves repeatability after records are correct—it cannot correct inaccurate VDO/CR records.
When should I insist on a try-in appointment?
Insist on a try-in when esthetic risk is high, phonetics are uncertain, VDO tolerance is unclear, or mandibular stability is limited. A try-in provides an opportunity to identify and correct these discrepancies before final manufacture.
What should the dentist and laboratory take forward?
DDS interpretation for clinical teaching: carry the clinically checked record through each stage, and return to the source of a discrepancy before final manufacture. The two case reports illustrate this reasoning; they do not prove one universal material combination or occlusal scheme.
- For the dentist: check the supporting tissues and trial denture. In Source A, functional border movements informed the impression and the printed trial revealed a jaw-relation discrepancy that needed adjustment. Assess border extension, seating and jaw relationship clinically before approving the final design. This is a reported case sequence, not proof that one impression technique suits every ridge.
- For the laboratory: preserve the approved clinical correction. In Source B, the adjusted try-in was rescanned and aligned with the original data before the final design. Ask for the approved reference and clear change notes, then compare the tooth setup and jaw relationship with that reference. This case used milled definitive components; its result does not validate a different manufacturing combination.
- For both teams: identify the exact material system. The two reports used different fabrication routes. Record the base material, tooth material and compatible bonding procedure before manufacture; follow their current IFUs for processing and assembly. A successful published case cannot establish compatibility between unrelated resins or replace the treating clinician’s assessment.
From evidence to everyday digital dentistry
At DDS, the teaching aim is to make the clinical-to-laboratory decisions in digital dentistry easier to discuss and apply. For related education in records, CAD design and denture manufacture, explore DDS Courses.
Published cases and image credits
Source A: García Zea E, Jaramillo S, Benitez Sellan PL. 3D-Printed Complete Dentures for Patients With Limited Mandibular Residual Ridges: A Case Report. Case Reports in Dentistry. 2025:8849925. The functional impression, printed trial and delivered-denture images reproduce original Figures 3, 2 and 4, respectively, from this one printed-base/printed-teeth case.
Source B: Luna-Domínguez CR, Luna-Vega AC, Salas-Orozco MF, Oliver-Parra R, Luna-Lara CA, Luna-Domínguez JH. Clinical Implementation of a Fully Digital Workflow for the Fabrication of a Maxillary Complete Denture: A Case Report. Dentistry Journal. 2025;13(11):524. The tray–rim/impression and DentalCAD arrangement images reproduce original Figures 3 and 6, respectively, from a different patient whose definitive denture base and teeth were milled.
© 2025 the respective authors. All five figures are reproduced under Creative Commons Attribution 4.0. Each image links to its original source figure. Image content is unchanged; WebP compression only. Figures retrieved 2 October 2026. These are published source cases, not DDS-treated patients, and no author or journal endorsement is implied. Neither report validates every printed-base/milled-teeth combination.